Showing posts with label Quick Knits. Show all posts

Monday, 28 September 2015

Crochet Tote Bag


This is just a quick post about a nice little pattern I found. During the summer, my much loved and well used leather handbag broke. I'd had it for years, and it was well used and abused, so it owed me nothing, but I was gutted nonetheless! To make matters worse, this happened about a week before payday and I was way too smashed to go out and buy another one. Considering that I had no money, but plenty of yarn at home, the solution was obvious; make another one!!

So I browsed around the internet and eventually found one I thought looked good. My criteria for a day-to-day handbag is that it has to have plenty of room in it (not massive, but not a clutch purse either) and also it needs to have a reasonably long shoulder strap. The pattern I used was from Naztazia.com and it was simply titled "DIY Easy Beginner Crochet Tote". Although I'm not a beginner, I wanted a nice bag that I could knock out in a couple of hours, and I really liked the look of this one. She also has a YouTube channel, and most of her patterns have a crochet-along tutorial. I've watched a few of her tutorials before and they're very clear and easy to follow.

For the main part of the bag, I used 2 skeins of Red Heart Super Saver which I had originally bought to make a wrap/stole, but found the colours didn't really work. The lighter contrast colour was also Red Heart Super Saver, and it was just the end of a skein I had left over from another project. 

It took me about 2.5 or 3 hours to complete the bag, and I'm delighted with the finished product. Using two strands at once makes it very sturdy, and it doesn't stretch or lose its shape, which is a problem I've had with other knitted or crocheted bags I've made in the past. To give you an example, I've had my large wallet, phone, glasses, baby wipes, tissues, and a full 750ml bottle of Pepsi Max in this thing, and there was no change whatsoever in the shape, and the strap is thick enough that it doesn't dig in to my shoulder.

The only downside to it is that it's not waterproof, so I've had to put it away in the last few weeks and buy (faux) leather handbag with a zip. Unfortunately a crochet handbag just isn't practical during Autumn and Winter in Ireland. Actually, lets face it, it probably wouldn't be practical in Spring either! But I fully intend on putting it to good use again next summer!!


Hook: 5mm hook from my own collection
Fastener: Wooden duffle that I robbed from my Mum's button box :D
           Main colour: Fall (2 x skeins)
           Stripe colour: Buff (about two thirds of a skein)


Thursday, 18 April 2013

Ruffled Fancy Scarf - Finished Product!


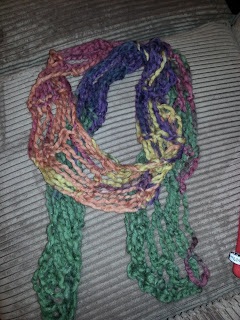
Following on from my last entry about what I'm currently knitting, behold the finished ruffle scarf!
I'm delighted with how it came out and I've actually been wearing it every day since I finished it. As I said before, the yarn caught my eye as I was shopping for supplies to make a scarf for my godmother, and being a total sucker for anything that's multicoloured, I couldn't resist buying a ball of it. 

There was a sample scarf knitted up with this yarn in the shop, and I thought it looked similar to the Rico Loopy yarn only slightly frillier. However, when it came to actually knitting with the stuff it turned out to have a few differences. Firstly, I didn't find it quite as easy to knit with as the Loopy. Also there were no instructions on the yarn wrapper band, which was a bit of a pain in the arse. The only thing it said was to use a 5mm needle. Now, if you decide to try knitting with this yarn I would strongly recommend that you DO NOT use a 5mm needle - it's much too skinny, the loops can come off the end of it (yes, this happened to me). I used the same 8mm one that I used on the Loopy scarf and found it worked much better.

On the band of the Loopy wool, it shows that you knit the scarf up by knitting into one of the 'thicker' holes on the top edge, skipping a 'thicker' hole and then knitting the following 'thicker' hole (as illustrated by this incredibly crappy MS Paint diagram):

So anyhoo, I figured that you'd knit the Krystal scarf in pretty much the same way as you'd do the loopy one (considering the lack of instructions on the band, it was pretty much trial and error). All was going well until I started to get to the end of the ball of yarn and realised that the scarf was only about a foot long, and unless you've got a neck like a Barbie doll, it's not going to be much use as a scarf. I'll admit the air turned blue for a moment, but I took a deep breath, counted to ten, and logged on to YouTube to see was there any joy to be had there. 

I couldn't find any videos to help me, however after a bit of googling I discovered that unlike the Loopy scarf where you'd do "knit, skip, knit, skip, etc" like in the diagram above, you actually knit into all the thicker bordered holes. Once I learned that, I unraveled the scarf and started again, thankfully it knits up pretty quickly once you've figured out how to make the damn thing!


The above picture is a closer view of the yarn, and as you can see it's beautiful! My favourite part is where the yellowy-gold transitions into the pink; it reminds me of a sunset. 

Overall, I really enjoyed knitting this scarf, despite the few hiccups at the start. Also, the range of colours in the other yarns they have is gorgeous, so I'd be surprised if I don't knit another one. It took me about an hour of leisurely knitting to finish it and I'm very happy with the end result, it's lovely and soft and goes with a variety of my outfits.

I found out later that there's actually a pattern booklet that is supposed to come with the yarn (it's free) and you just take one from the shop, however I think that it would be much easier if the manufacturer put the basic instructions on the wool band, and also maybe a link to where you can download the pattern from their website because I can't imagine I'm the only person who hasn't realised that the pattern comes separately. (Or maybe I am...........that's embarrassing!!)


Wool from: Springwools
Needles from:  my personal stash :-)

Monday, 1 April 2013

Super Cosy Adult Beanie


Ok, I have to start out this post by making a confession; this hat wasn't actually supposed to be for me, it was meant to be for my cousin. He'd asked me to knit him a beanie and I ordered the wool online in a rush, not noticing in the description that the wool has a glittery fleck in it (you can see it a bit in the photo). Obviously, when the wool arrived and I saw the shimmery bits, I knew it wouldn't be any use for a hat for him.........but I thought 'waste not, want not' and I ended up with a lovely hat! (I've since selected a more appropriate wool for a guy in his mid twenties and his beanie is under construction at present.)

This hat was a really easy piece to make, mainly due to the beautiful wool. It's really, really thick and so soft - almost a velvety chenille type texture. I used a circular loom and when I started to knit it, you couldn't see the individual stitches, it produced a rib-like pattern that you can see in the photo above. (By the way, the photo doesn't do it justice by a long shot. I must apologise for my lack of skills as a photographer!)

The whole thing took just under an hour to finish and I'd make another one in a heartbeat. It's definitely the warmest hat I have, and it's lovely and soft, no itching or anything like that. The wool has just the right amount of stretch so that the stitches don't separate when you put the hat on - making it extra cosy!

I've included a link to the wool, below. I'm seriously considering getting another ball to make a matching scarf if this cold snap continues!


Wool from: Springwools 
Loom from: eBay


Tuesday, 19 February 2013

Long Loom Scarves


These two scarves were Christmas presents for my sister and my dad, both were knit using super chunky wool and a long loom. For my sister's (the black one) I used a fine shimmery purple wool, along with the main black wool, to give it a bit of sparkle. 

They're quick to knit and I love the pattern the long loom gives in the stitches. These looms are a good idea for anyone who's not great at maintaining the same tension all the way through their knitting, because they keep the knitting and the stitches nice and even.


Similar to the circular looms, the long looms also come in four different sizes. I've seen them online in sets with all four sizes, however in any of my local knitting supply shops, they all seem to be sold individually. Each loom also comes with a pick/hook and a wool needle. 

If you're going to buy an individual one, I'd recommend buying the longest one, simply because there's a greater variety of projects you can use it for - you don't have to use every peg on the loom, so if you wanted to knit a narrow scarf you could use the first 8 pegs, and for wide scarves or wraps you could use the whole length of the loom.


Wool from: Springwools
Loom from: Home Focus at Hickeys


Thursday, 14 February 2013

For that special someone....... Cute Knitted Hearts!


What with the day that's in it, I thought I'd do a Valentine's post. I used some bamboo cotton that I had left over from a Christmas project to knit this little heart, but you could use pretty much any wool you want. I didn't have a pattern to work from, so I made one up myself. Here's how I made it:

What you'll need:
  • Wool of your choice (I used bamboo cotton, similar to this, it's Double Knitting weight)
  • 3 x double pointed needles (I used 2.5mm metal needles)
  • Scissors
  • Point Protectors (optional)


Stitches used:

Let's get started!

Cast on three stitches.
First row:   k1, k1f&b, k1
Second row:    k1, k1f&b, k2
Third tow:    k1, k1f&b, k3
Continue on until you have the desired width for the heart (I did 24 stitches on this one) there needs to be an even number of stitches. Divide the stitches in the middle so that half are on one needle and the other half are on the second needle. You are now only going to be working on half of the heart at a time. Leave 12 of the stitches on one needle and work on the other 12 with the third double pointed needle.
Next row: k1, k2tog, k to end of row
Continue until you have 3 stitches left
Cast off
Repeat on other side.


These cute little hearts are really easy and quick to make, and you could use them for lots of different things - patches for hats or scarves, you could make a giant one with big needles and very chunky wool and use it as a table mat, you could attach lots together to make crochet type clothes etc.

I decided to use this one to make a Valentine's card for my husband. I didn't do anything really fancy with it, I just used a hot glue gun to stick it to a plain ivory card - simple and sweet!


Saturday, 9 February 2013

Loopy Scarf


I knitted this one for my Mum last Mother's day (I also did one in a different colour for my mum in law, but I haven't got a picture of it). I had been browsing around YouTube looking at various knitting videos and I saw a video tutorial for this scarf. I love the look of the scarf, and figured it would be something both my mum and my husband's mum would get a lot of use out of. Most importantly (given that it was about ten days til Mother's Day) it looked like a project that would knit up quickly!

Once you get the hang of which loop to knit into, the scarf is nice and easy to make. The yarn is called Rico Loopy and each ball makes one scarf, so there was no need to do up gauge swatches to work out how much wool would be needed. When you look at the wool when it's in the ball, it's hard to imagine what the finished product will look like. (Obviously aside from the picture on the label.) Here's the wool:


One thing I'd recommend you get, especially if you need to set your knitting down at any stage (like to answer the phone, get tea or answer a call of nature) is a stitch holder. The loops make quite large stitches and it's very easy for the stitches to slip off either end of the needle. This happened to me a couple of times and it's a nightmare trying to pick them back up again. If you can't get your hands on a stitch holder, thread a piece of chunky yarn through all your stitches and tie the ends in a loose bow - it'll do the same job as the stitch holder but it'll take slightly longer to put in and take out.

I think the scarves took me two to three hours each to knit. I'd had dinner, watched tv, etc while I was making them so I reckon if you actually sat down and just focused on it, you'd have a scarf knitted in under 90 minutes. I was very pleased with how they turned out, and I'd definitely make one again. 


Wool and needles from: Springwools
Video tutorial from: Black Sheep Wools

Wednesday, 6 February 2013

Drop Stitch Scarf


I made this for my youngest sister for Christmas just gone. It's made using MASSIVE 25mm needles, which are about as thick as a broom handle. The wool is Sirdar Indie in shade #151, and I think it's gorgeous! I love colour combinations!

It was quick enough to knit once I got the hang of it, I think after about the 3rd row I got into a rhythm and the whole thing was finished in less than an hour.


Needles from: Home Focus at Hickeys
Wool from: Home Focus at Hickeys
Pattern and video tutorial from: Hulu Crafts on YouTube