Showing posts with label 2013. Show all posts

Sunday, 19 January 2014

Angry Birds!!


Twas the week before Christmas, and I was seriously stuck for something to get my son. Ok, Santa was all sorted with his gifts (he started with Amazon pre-orders back in June, the super organised fella that he is!) but I wanted something for under the tree for baba from my hubby and I. As any reader has probably already guessed, I love making stuff for him, so with that in mind and the fact that he was going to be getting tonnes of other toys between the jolly old St Nick and our extended families, I decided his present was going to be home made. Now, as I said, twas the week before Christmas, so I wasn't going to have time to make garments, but I figured I'd be able to knock out a decent toy for him in under a day and chose to make an Angry Bird.

I picked Red Bird because his basic shape would be the easiest to figure out - he's essentially a ball. The beak and stuff were going to be slightly more complicated because I didn't have a pattern. Now there are hundreds of Angry Bird crochet and knit patterns out there in internet land but honestly, none of the ones I looked at really jumped out at me. Some had elements I liked but then other bits that I hated so I figured I'd wing it (no pun intended) and see how things went. 

For the main body I just made one big sphere, now for this I did use a pattern - it's one I found on the internet a while ago on how to make a perfect amigurumi sphere, and it's amazing, the results are perfect every time. It's from Ms Premise Conclusion and she's actually got it as a free download on her site, which is really cool because she must have put an INSANE amount of effort in to figuring all of these out. I used the largest size pattern which was a 30 row sphere.

I wanted the body to be fairly substantial in size, about the size of a small football as opposed to maybe a baseball or tennis ball, so I used a 4.5mm hook and also two strands of yarn at the same time. This made the fabric nice and thick and also ensured that I could stuff it nice and firmly without having to worry that the stuffing would be visible between the stitches. When making the sphere, I find it easiest to crochet until you've got about 2 or 3 rows left, then stuff and continue crocheting. If it's starting to feel a bit loose as you're about to close the sphere you can work in a tiny bit more stuffing as you do the last round. NB: if you're using 'safety eyes' you'll need to attach these BEFORE you stuff and close your sphere.


The whites of the eyes were fairly straightforward, they're just plain circles. I used white DK weight yarn and a 3.5mm hook, then I made two circles with 36 stitches around. To attach them I firstly positioned them on the body before it was stuffed and then applied the safety eyes going through both the 'eye' and the 'body' fabric. Then, after I'd stuffed and closed up the body, I took some black yarn and the same 3.5mm hook and worked a row of single crochet around each eye and then took a tapestry needle and used the black yarn to secure the edges of the eyes to the body. The eyebrows were just two pieces of 14 double crochets, and then I did another row of single crochet halfway along each of them to give the 'frowny' expression. They were also made using the 3.5mm hook.

To make the 'tummy' of the bird, I got some beige coloured yarn and just made a flat circle. To figure out how big to make the circle, I checked how many stitches the body had at the widest part and used that as a rough guide. My bird had 59 stitches around it's middle, and I wanted his 'belly' to be a bit smaller than that so I worked until my circle had a 54 stitch circumference. I attached the tummy after the body had been stuffed because it made it easier to hide the stitches holding it on.

The beak was a bit of a challenge, I couldn't figure out whether to do it two dimensional or three dimensional. I checked a load of patterns online and there seemed to be a fairly even split between both, so I actually made one of each and held it up on the bird to see which one I preferred. In this case I used the 3D one (as you can see) but I actually held on to the 2D one also because I'm planning to make an Angry Bird hat for my son and the 2D beak would be perfect for that. The 3D beak is basically just a cone shape, which I stuffed and then attached on with the yellow yarn. I got some black yarn and sewed up along each side to give it the illusion of being more pyramid shaped. I also did a bit of sewing at the top of the beak to improve the shape between the eyes.

For his weird little doo-dads on the top of his head I again used the 3.5mm hook and crocheted two 'tubes' that tapered off towards the end, one slightly shorter than the other. Then I put a teeny bit of stuffing inside them before I sewed them on.


The tail was the finishing touch, and it was news to me that Angry Birds even had tails but that's another story. Don't laugh, but the tail is actually a shamrock, I just used black yarn and sort of smushed it about until I liked how it looked.

And that's it! One Angry Bird! My son loves it and has a great time throwing it around the living room while yelling 'angeee birds!'. Thank god it's not made out of anything harder than yarn!!!


Sphere Pattern from: Ms Premise Conclusion
Stuffing from: Springwools
Safety Eyes from: Springwools
Yarns and hooks from my own stash.

Sunday, 29 September 2013

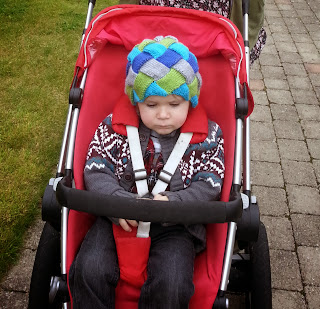
Entrelac Hat!


Hi All!

Well first, I must once again apologise for my lack of posts over the summer. What with the unexpectedly warm summer we had, I found it very difficult to actually get any knitting done. I love sitting out in the sunshine (ok, under an umbrella, but watching the sunshine) and knitting along, but it was just so hot that trying to knit anything was like sitting under a woolly blanket, so I ended up packing away my knitting for those lovely sunny days.

A couple of weeks ago, when the weather started to turn, I picked up my needles again and started a new project - Entrelac. This was something I'd never tried before, and any time I'd looked at pictures and videos of it, it looked terrifying! I decided I'd give it a go, so after watching many, many youtube tutorials, I grabbed some chunky wool and thick needles and knit up a sample piece.

It actually turned out to be easier than I thought, once I got into the rhythm of it. The main thing I found was that it was really important to keep count of your stitches, seeing as it's not like knitting straight along until you reach the end of a row, but once you remember to do that then it's a lot less complicated than it looks.

Each winter I've knitted a hat for my son. Unfortunately for him, he inherited my slightly large size head, so it can be difficult to find nice hats to fit him. I decided that this winter's effort was going to be in Entrelac. Knitting it in the round actually turned out to be easier than knitting a flat piece, and I was surprised how straightforward it was, once I'd joined the two sides together. 

I used double knitting wool that I had in the house already, and 4.5mm circular needles. It took me about 2 days to complete, but that was two days of doing not-a-whole-lot else. 

I'm very pleased with how it came out, and most importantly, so is my son! I'm currently knitting one for my husband and one for my mum, so my knitting schedule is going to be nice and full for the next few weeks!

Here's my handsome little man modelling the finished product!


Wednesday, 12 June 2013

How To: Pyjama Case/Sock Bag/Blanket Bag/ Nappy Holder Thing


Lately I've noticed that my son's wardrobe has been looking a bit messy, and seeing that he's only a toddler, he can't be blamed for it. So when I checked in the wardrobe to see what was going on, I noticed that the little basket where I used to store his socks had gotten far too small for the job. It worked grand when his socks were teeny tiny and would have fitted onto one of my fingers, but he's getting a lot bigger now and the socks were overflowing out of the basket and all over the wardrobe. 

I realised that it was time for a sock storage overhaul, which led me to make this cute sock bag!  It's actually pretty versatile, because it can also be used to hold a multitude of different things, for example: pyjamas, socks, undies, bibs, muslin squares, kitchen tea towels, dusting cloths, nappies, toys, or you could even store a spare set of kiddies bed linen in it and hang it on the end of their bed so it would be close to hand if there was a night time 'accident'. 

This is a fairly easy project to make. I didn't have a pattern or anything, I just had an idea of what I wanted and went from there. I'm going to outline the steps below, so if anyone who's interested can make one if they want. If you're a child, or just not good with sharp objects or sewing machines, make sure there's an adult around to help you with this. (I had my mum on standby for sewing help, and my husband on standby to drive me to Accident & Emergency in case I cut myself with the scissors or ran my hand through the sewing machine - both things have happened before).

So here's my how-to guide! I hope you enjoy it and if you've got any questions then leave me a comment and I'll do my best to answer!


What You'll Need:

  • 1.5m x 1m fabric of your choice
  • 1.5m x 1m wadding (I ended up with a bit left over but it's better to have extra in case of mistakes)
  • A needle, thread, pins and a good sharp scissors
  • A sewing machine (doesn't have to be super fancy, a basic one is fine)
  • A button (optional)
  • Ribbon (optional)

Before You Start:

I'd allow about 2 hours to complete this project, so if you can, try to do it at a time when you can just go from start to finish with minimal interruption. Make sure you have enough space to work in; I used my mum's dining room table to work on which meant I had enough room to lay out my fabric and have the sewing machine set up at the same time. Also, make sure your work space is somewhere that has good light so you can see your stitches more easily, this is especially important if you make a mistake and have to do unpicking.


Step 1:


Take your fabric and fold it in half, then in half again. Cut along the side and the top so you now have four pieces of fabric that are the same size. Set two of the pieces aside for now, then take the two remaining pieces and cut them in half, lengthways. These pieces will be the front part of your project, and from now on I'll refer to them as 'front pieces'. 


Step 2:


Take two of your front pieces and put them together with the patterned sides facing each other. Tack the two pieces together down one side (it's better to do your tacking in a different colour thread so it's easier to see and pull out afterwards). Next, use your sewing machine to sew the side that you have tacked. Use a normal straight stitch. Once the pieces are together, pull out the tacking thread. Repeat this step with the other two front pieces. 


Step 3:


Now we're going to stuff the front pieces. Take your wadding and cut a strip slightly smaller than a front piece, then lay it on the front piece as shown above. Wrap the front piece around the wadding, so that the patterned sides of the fabric are now on the outside. 


Step 4:


Using the sewing machine, sew the open side of the front piece together so that your wadding is secured inside. Leave the ends open. Repeat step 3 and 4 with the other front piece. You should now have two pieces that resemble cot bumpers. One side will have a nice invisible seam, and the other side will have the slightly messier seam that you just sewed to seal the wadding inside.


Step 5:


Now take the two stuffed front pieces and lay them on top of each other, make sure the neat seam is on top of the other neat seam, and the messy seam is on top of the other messy seam (as shown above). What you're going to do now, is sew the two pieces together along the side that has the neat seams. This can be quite tricky, so take your time. Using the sewing machine, start running the two pieces through so that they're joined together.

Once you get about halfway up, stop the machine and leave an open gap of about 5 or 6 inches, then continue sewing until you get to the end of the fabric. When you've finished you should be left with something that looks like this:


Set this piece aside for now and proceed to the next step.


Step 6:


Grab the two large pieces of fabric that you set aside earlier, these will now be referred to as the 'back pieces'. Cut a piece of wadding that is roughly the same size as one of the pieces (it doesn't matter if it's slightly bigger because we'll be trimming off any excess at the end). Sandwich the wadding between the two back pieces so that the patterned sides of the fabric are facing the outside, as shown above. Now use the sewing machine to sew the sides together. Leave the ends open, like you did with the front pieces.

Again, this can be quite tricky so take your time. It doesn't matter if this isn't the neatest sewing you've ever done, these edges aren't going to be seen in the finished product, so if it looks a bit messy, don't worry. Once you've sewn the sides together, if there's any big bits of wadding sticking out beyond the edge of your fabric, then trim them back so that they're in line with the fabric edge.


Step 7:


This is where things start coming together. It's very important to remember that you will be sewing this together inside-out, so place it together with the 'outsides' facing each other. For the back piece this doesn't really make much of a difference, unless there's a bit of your pattern that you would prefer to see on the outside. For the front pieces, you want your seams to be on the inside of the bag when it's finished, so lay the front piece on top of the back piece with the seams facing up.

Now bring the project to the sewing machine and carefully sew the two pieces together. As with steps 5 and 6, take your time doing this and make sure that the stitches are going through all the pieces of fabric. Leave sewing the top part together until last if you plan on hanging the bag up, because this is where you attach your ribbon. If you don't want to hang the bag, then once you've sewn up all the sides, turn the piece right-side-out and proceed to step 8.

If you're adding the ribbon, wait until you've gotten both of the sides and the bottom sewn together. Now take your ribbon and fold it in half to make a loop (the loop can be as long as you want, it's up to you). Insert the loop in between the front piece and the back piece of the project, and leave the two ends of the ribbon sticking out. Sew the top part together, so that the stitches secure the ribbon between the front and back pieces. Now turn the piece right-side-out, your ribbon loop should be sticking out the top of the bag.


Step 8:


This step is optional, but I'd recommend it, especially if you're planning on hanging the bag up because it'll stop your stuff from falling out. 

To make the loop for the button closure you can either use some scrap fabric, or some ribbon. I used scrap fabric. I took two small pieces of fabric about 1 inch wide and about 4 inches long and sewed them together with the patterned sides facing each other. I only sewed the sides and left the ends open, so I had a little 'tube', which I then turned inside out so that the pattern was on the outside. 

Pick a spot around the middle of the opening at the front of the bag, then hand stitch your ribbon or fabric loop to the inside of the bag, as shown above. Make sure your stitches only go through the fabric on the inside layer of the bag, that way they won't be seen on the outside, and everything will look neater. Next, sew your button on to the opposite side of the front piece, at the same level as your loop so your bag now has a fastener.


Step 9:


Fill your bag with whatever you plan on putting in it, then step back and admire your handiwork!


Fabric & Wadding from: Hickeys


Saturday, 25 May 2013

Piggy Knapsack


I was browsing around in Hickeys yesterday when I came across a load of little felt craft kits. Most of them were for purses and stuff like that, but then I noticed a selection of adorable little kiddie backpacks. There were four different designs - pig, cat, panda and a thing that looked a bit like a cross between a fox and a raccoon. As you can see, I chose the pig.


The pack cost EUR15 and is supposed to contain everything you need to make the backpack. It even has a little plastic needle so it would be something that young kids could make with some adult help (not the under threes though, due to small parts). The one thing I noticed was that the back part of one of the ears was missing, but by the time I noticed I'd already started putting it together. Luckily, I was able to improvise by tracing the shape of the ear onto a thin piece of cardboard and I used that instead. 

The other thing that was annoying was that there wasn't enough thread either. I ended up having to get more of both the brown and the white thread. However, despite that, I really enjoyed making it. It took me around an hour or two and the instructions were nice and straightforward. In spite of the cardboard backing on one ear, I'm happy with how it turned out and my little boy loves it, he's hilarious toddling around the sitting room with it and it's nearly as big as he is!

Friday, 17 May 2013

First-Time Cardigan


Well I'm cutting my "garment" teeth on this delightful cardigan here. I'm knitting the navy cardigan in the main picture for my sister.

Yes, I'm aware it's a bloke's cardigan, however she wanted something a bit big and warm, kinda like a woolly version of boyfriend jeans. Her boyfriend will also likely benefit, because she might be less inclined to steal his sweaters once this is finished. 

When I first read the pattern, it seemed a bit daunting, but I'm making good progress with it and so far (touch wood) there haven't been any major disasters. Because the wool is nice and chunky, the size of the pieces increases quickly, which is a nice motivator - you can start to see the piece as part of the finished item, as opposed to knitting something with 4 ply and for ages it just looks like a random strip of knitting which can be almost soul destroying!

I'll post a full write up when I'm finished (hopefully not too far in the future) and I'll also put up pictures of the finished product!

If anyone's got any tips for making clothes, particularly for sewing all the bits together, I'd love to hear them!


Friday, 10 May 2013

Blast From The Past.........Friendship Bracelets!!


Anyone else remember these dealies? I made loads of these when I was about ten but apparently they're the 'in' thing right now (?). 

Anyhoo, seeing them in various magazines and blogs over the last while made me awfully nostalgic, so I got out my embroidery thread and decided to have a go at making one.

It's been about 15 years since I made friendship bracelets, so I was a tad rusty, but once I got going it was like riding a bike! In fact, it was easier than riding a bike, especially considering that when I ride a bike it usually results in a terrible crash and a visit to the hospital!

I think I managed to knock out this friendship bracelet in about an hour (my ten year old self would be disgusted) and while it's not as neat as it could be, I'm pleased with it! 

I'm going to make a toddler sized version of this for my son next!

Thursday, 18 April 2013

Ruffled Fancy Scarf - Finished Product!


Following on from my last entry about what I'm currently knitting, behold the finished ruffle scarf!
I'm delighted with how it came out and I've actually been wearing it every day since I finished it. As I said before, the yarn caught my eye as I was shopping for supplies to make a scarf for my godmother, and being a total sucker for anything that's multicoloured, I couldn't resist buying a ball of it. 

There was a sample scarf knitted up with this yarn in the shop, and I thought it looked similar to the Rico Loopy yarn only slightly frillier. However, when it came to actually knitting with the stuff it turned out to have a few differences. Firstly, I didn't find it quite as easy to knit with as the Loopy. Also there were no instructions on the yarn wrapper band, which was a bit of a pain in the arse. The only thing it said was to use a 5mm needle. Now, if you decide to try knitting with this yarn I would strongly recommend that you DO NOT use a 5mm needle - it's much too skinny, the loops can come off the end of it (yes, this happened to me). I used the same 8mm one that I used on the Loopy scarf and found it worked much better.

On the band of the Loopy wool, it shows that you knit the scarf up by knitting into one of the 'thicker' holes on the top edge, skipping a 'thicker' hole and then knitting the following 'thicker' hole (as illustrated by this incredibly crappy MS Paint diagram):

So anyhoo, I figured that you'd knit the Krystal scarf in pretty much the same way as you'd do the loopy one (considering the lack of instructions on the band, it was pretty much trial and error). All was going well until I started to get to the end of the ball of yarn and realised that the scarf was only about a foot long, and unless you've got a neck like a Barbie doll, it's not going to be much use as a scarf. I'll admit the air turned blue for a moment, but I took a deep breath, counted to ten, and logged on to YouTube to see was there any joy to be had there. 

I couldn't find any videos to help me, however after a bit of googling I discovered that unlike the Loopy scarf where you'd do "knit, skip, knit, skip, etc" like in the diagram above, you actually knit into all the thicker bordered holes. Once I learned that, I unraveled the scarf and started again, thankfully it knits up pretty quickly once you've figured out how to make the damn thing!


The above picture is a closer view of the yarn, and as you can see it's beautiful! My favourite part is where the yellowy-gold transitions into the pink; it reminds me of a sunset. 

Overall, I really enjoyed knitting this scarf, despite the few hiccups at the start. Also, the range of colours in the other yarns they have is gorgeous, so I'd be surprised if I don't knit another one. It took me about an hour of leisurely knitting to finish it and I'm very happy with the end result, it's lovely and soft and goes with a variety of my outfits.

I found out later that there's actually a pattern booklet that is supposed to come with the yarn (it's free) and you just take one from the shop, however I think that it would be much easier if the manufacturer put the basic instructions on the wool band, and also maybe a link to where you can download the pattern from their website because I can't imagine I'm the only person who hasn't realised that the pattern comes separately. (Or maybe I am...........that's embarrassing!!)


Wool from: Springwools
Needles from:  my personal stash :-)

Friday, 5 April 2013

Ruffled Fancy Scarf


Just a quick update on one of the things I'm currently knitting. I was out shopping (at Springwools) for some wool for a scarf for my godmother the other day when my beady eyes fell upon this gorgeous yarn! 

I've never knitted with it before, but from what I can see it's very similar to the Rico Loopy yarn, but a bit thinner. I'm a complete sucker for anything brightly coloured or shiny, so naturally my eye was drawn to this. There were a huge variety of colours on offer, but I went for this one because I loved the way the colours transitioned into one another (especially the gold into the pink; it reminds me of a sunset!).

I've started the scarf (a little gift from me, to me) and at the point of writing this I've knitted about 10 inches or so.

I'll post an updated entry when it's done, along with some pictures of the finished scarf and my thoughts on the wool and the knitting process.

Monday, 1 April 2013

Super Cosy Adult Beanie


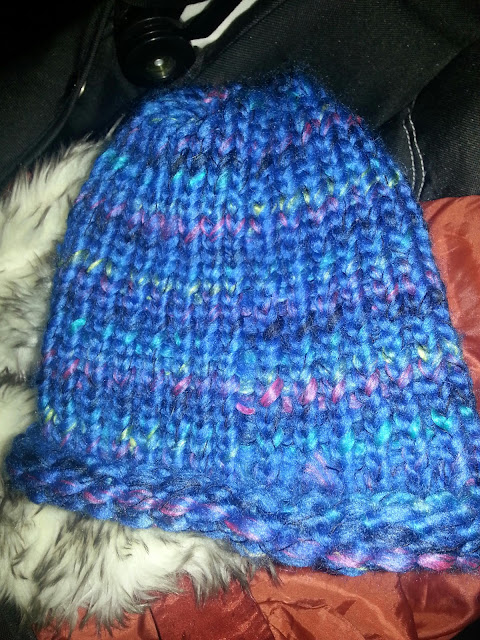
Ok, I have to start out this post by making a confession; this hat wasn't actually supposed to be for me, it was meant to be for my cousin. He'd asked me to knit him a beanie and I ordered the wool online in a rush, not noticing in the description that the wool has a glittery fleck in it (you can see it a bit in the photo). Obviously, when the wool arrived and I saw the shimmery bits, I knew it wouldn't be any use for a hat for him.........but I thought 'waste not, want not' and I ended up with a lovely hat! (I've since selected a more appropriate wool for a guy in his mid twenties and his beanie is under construction at present.)

This hat was a really easy piece to make, mainly due to the beautiful wool. It's really, really thick and so soft - almost a velvety chenille type texture. I used a circular loom and when I started to knit it, you couldn't see the individual stitches, it produced a rib-like pattern that you can see in the photo above. (By the way, the photo doesn't do it justice by a long shot. I must apologise for my lack of skills as a photographer!)

The whole thing took just under an hour to finish and I'd make another one in a heartbeat. It's definitely the warmest hat I have, and it's lovely and soft, no itching or anything like that. The wool has just the right amount of stretch so that the stitches don't separate when you put the hat on - making it extra cosy!

I've included a link to the wool, below. I'm seriously considering getting another ball to make a matching scarf if this cold snap continues!


Wool from: Springwools 
Loom from: eBay


Monday, 25 March 2013

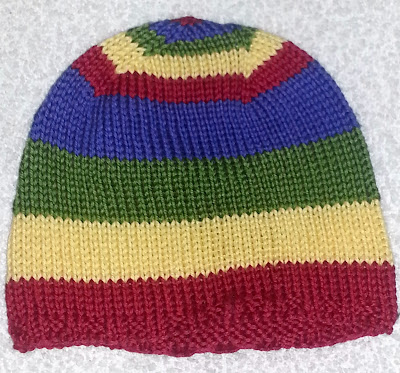
Stripy Baby Beanie


Well firstly, I must apologise for the length of time between this and my last post, I haven't been very well and also my hubby has been using the laptop a lot for college, meaning that I haven't been able to post stuff (I think it's an excellent reason for me to get a macbook but he's not convinced). Anyhoo, if anyone's been suffering from any ill-effects due to a lack of knitting related news, I'm very sorry.

So on to the matter at hand (or head. Ha!) the lovely colourful hat above. I knitted this on 4mm circular needles, using 100% cotton double knitting wool. It was actually wool I had left over from another project I did so this hat would be a good way of using up numerous 'scrap' balls. 

Obviously, the advantage of using cotton is that it can be easily washed, which is pretty much essential if you're making anything for kids or babies. Also it's hard wearing and not too heavy, so while it's nice and warm, it'll also do for those days when it's not quite cold enough for a massive furry hat, but too cold to go out hatless.

As I said above, I used circular needles for this one. The advantage to using them is that, even though they take a little longer than using a loom, you've got more flexibility when it comes to sizing of the hat (with the round looms if your head doesn't fit the loom size you're pretty much out of luck). I also much prefer the finish you get at the top of the hat when you use circular needles - you can taper it in gradually as opposed to having to make a long tube and then gather it all at the top.

This hat took me about 2 to 3 hours overall to knit, but I did it at periods over a number of days.


Wool from: Go Woolly
Needles from: Go Woolly

Thursday, 21 February 2013

Log Cabin Blanket Patch #2


So this is the second patch in the blanket, and I'm pleased with how it's coming along! My son picked out most of the colours in this patch, I think he has good taste. 

One of the things I'm enjoying most about knitting the blanket is that it's made up of individual patches, so you feel like you've accomplished more as each patch is completed, as opposed to when you're knitting one huge piece and it's only towards the end that you start to be able to 'see the finish line' so to speak. 

I've just started patch number three, so hopefully I'll be posting that up here shortly!

Thursday, 14 February 2013

For that special someone....... Cute Knitted Hearts!


What with the day that's in it, I thought I'd do a Valentine's post. I used some bamboo cotton that I had left over from a Christmas project to knit this little heart, but you could use pretty much any wool you want. I didn't have a pattern to work from, so I made one up myself. Here's how I made it:

What you'll need:
  • Wool of your choice (I used bamboo cotton, similar to this, it's Double Knitting weight)
  • 3 x double pointed needles (I used 2.5mm metal needles)
  • Scissors
  • Point Protectors (optional)


Stitches used:

Let's get started!

Cast on three stitches.
First row:   k1, k1f&b, k1
Second row:    k1, k1f&b, k2
Third tow:    k1, k1f&b, k3
Continue on until you have the desired width for the heart (I did 24 stitches on this one) there needs to be an even number of stitches. Divide the stitches in the middle so that half are on one needle and the other half are on the second needle. You are now only going to be working on half of the heart at a time. Leave 12 of the stitches on one needle and work on the other 12 with the third double pointed needle.
Next row: k1, k2tog, k to end of row
Continue until you have 3 stitches left
Cast off
Repeat on other side.


These cute little hearts are really easy and quick to make, and you could use them for lots of different things - patches for hats or scarves, you could make a giant one with big needles and very chunky wool and use it as a table mat, you could attach lots together to make crochet type clothes etc.

I decided to use this one to make a Valentine's card for my husband. I didn't do anything really fancy with it, I just used a hot glue gun to stick it to a plain ivory card - simple and sweet!


Wednesday, 6 February 2013

Dogs need jumpers too......right?


Ok, so anyone who knows me will know that I'm certainly not opposed to dressing my dogs in fabulous jumpers. Some people (namely my husband and my father) may argue that said jumpers are ridiculous, however I vehemently disagree. Some dogs are very style conscious, and just love to look their best, well, either that or they're too passive to bother trying to chew their outfits off. 

My Cocker Spaniel, Bella, already has a variety of jumpers, a coat, and a bathrobe (laugh all you want, that thing is damn handy when she's just had a bath and is soaked). Last August, we acquired a new canine friend in the form of Lola, a half labrador - half bulldog, and she's grown up to be quite large, so there's just no way she and Bella will be able to share outfits. To that end, I went on Amazon and purchased the book above, so I can knit her a funky sweater. I ordered it today, so I can't wait for it to arrive! It'll be a nice side project to my log cabin blanket, and doubtless my husband will have hours of fun slagging me about knitting for dogs, so really it'll benefit the whole family!


Tuesday, 5 February 2013

Super Chunky Blue Beanie

I knitted this beanie for my son using a circular loom. It was a quick job, probably 2-3 hours from start to finish. This loom came in a set of four and I used the second smallest one for this hat. It would do a toddler/small child.
Wool from: Springwools
Knitting looms available through various sellers on Ebay.

Log Cabin Blanket Patch #1


I started knitting this about a week ago and it's moving along nicely. It's all knit stitches (no purling or increases! yay!) so it's a nice one to do to relax because all you have to do is count the rows as you go. I'm using all acrylic wool, I think I've got a selection of about 20 colours in all. They're various colours from Hayfield Bonus, Pricewise and Big Value, seeing as I wanted to keep the price down and not skimp on the quality. I think the most expensive ball of wool was about €2.99. They're all Double Knitting weight and I'm using 4.5mm metal circular needles (cable length 60cm).


Pattern from: Very Pink.com
Wool and supplies from: Springwools